

16″ Shower Plumbing: Genius Easy Install
Tired of that old, drippy shower? Want a rain-like experience? Installing a new 16-inch shower head can seem daunting, but it’s totally doable! Many homeowners think this sort of upgrade needs a pro. But with the right guidance, you can transform your bathroom yourself. Let’s break it down easily. You’ll feel confident and enjoy that spa feeling in no time. Get ready for a simple, step-by-step guide that makes installing your new shower a breeze!
Quick Summary: Your Shower Upgrade Journey
Ready to ditch the dribble and embrace a luxurious downpour? Installing a 16-inch shower head is easier than you think. This guide breaks down the process into simple, manageable steps. We’ll cover everything from checking your current setup to the final tightening. You’ll learn what tools you need and common pitfalls to avoid. Get set for a refreshing new shower experience without the hassle!
Why a 16″ Shower Head? The Big Picture
Upgrading to a larger shower head, like a 16-inch model, is a popular way to enhance your bathroom. It offers a more immersive, spa-like experience. Think of the difference between a gentle mist and a full, relaxing rainfall. That’s the kind of transformation a 16-inch shower head can bring.
Beyond the luxury, larger shower heads can also be quite efficient. Many are designed to use less water while still providing excellent coverage. This means you can enjoy a more satisfying shower while being mindful of your water bill and the environment. It’s a win-win!
The “easy install” part is key. While it sounds like a big job, many modern 16-inch shower systems are designed with DIYers in mind. They often come with straightforward instructions and fewer complex parts than you might expect.
Is This DIY-Friendly? Let’s Find Out
The good news is, yes! For most homeowners, installing a 16-inch shower head is a very achievable DIY project. The plumbing connection is typically standard. The main difference from a smaller shower head is the arm and potentially the valve rough-in if you’re changing the whole system.
This guide focuses on replacing an existing shower head and arm, which is the most common DIY scenario. If you’re doing a full bathroom remodel or moving plumbing lines, that’s a bigger job. But for a direct replacement or upgrade, you’ve got this!
We’ll cover the steps that make it feel simple, even if you’ve never touched a wrench before. It’s all about taking it one step at a time.
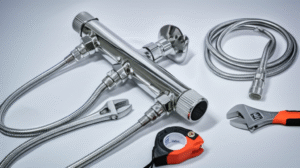
Tools & Materials: Your Essential Toolkit
Before you start, gather your tools. Having everything ready makes the job much smoother. Don’t worry, most of these are common household items.
Essential Tools:
- Adjustable wrench (or two)
- Plumber’s tape (also called Teflon tape or thread seal tape)
- Screwdriver set (Phillips and flathead, just in case)
- Allen wrench set (often included with the new shower head)
- Bucket or old towels
- Safety glasses
- A ladder or sturdy step stool (if needed to reach)
Materials You’ll Need:
- Your new 16-inch shower system (including shower head, shower arm, and any included trim pieces)
- Possibly a new shower arm if not included or if yours is damaged
It’s a good idea to check the manufacturer’s instructions for your specific 16-inch shower head kit. They often list any special tools required.
Before You Begin: Safety and Preparation
Safety first! Plumbing can seem straightforward, but there are a couple of crucial steps to take before you touch anything.
Turn Off the Water:
This is the MOST important step. You don’t want any surprises with water spraying everywhere! Find the shut-off valve for your bathroom or, even better, the main water shut-off for your house. If you’re unsure where these are, now is a good time to find out. For your house’s main water shut-off, you can often find it in a basement, utility closet, or near your water meter. Once you’ve shut off the water, turn on a faucet somewhere else in the house to drain any remaining water in the pipes.
Protect Your Tub or Shower Floor:
Place old towels or a drop cloth in your shower or bathtub. This protects the surface from scratches from dropped tools and also catches any stray drops of water.
Check Your Existing Shower Arm:
Look at how your current shower arm connects to the wall. Most are screwed into a fitting behind the wall. Make sure it’s not corroded or damaged. If it looks rough, you might need to replace it along with the new shower head.
Knowing where your shut-off valve is is a fundamental home maintenance skill. Resources like the EPA’s WaterSense program offer great tips on water conservation, which starts with understanding your home’s water system.
Step-by-Step: Installing Your 16″ Shower Head
Let’s get to it! Follow these steps carefully, and you’ll have your new shower ready in no time.
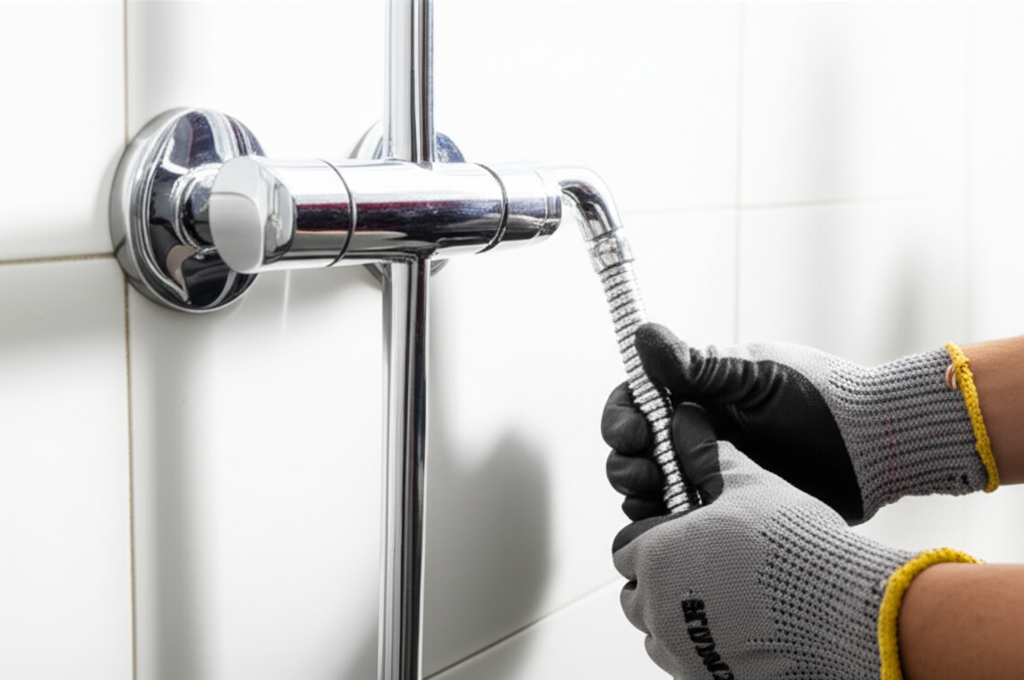
Step 1: Remove the Old Shower Arm and Head
This is where the magic (and a little bit of effort) happens. Grab your adjustable wrench.
- Loosen the Shower Head: Turn the shower head counter-clockwise with your wrench. If it’s stuck, try wrapping a cloth around it to get a better grip and protect the finish. Sometimes, a little gentle wiggling is all it needs.
- Loosen the Shower Arm: Now, place the wrench on the part of the shower arm that screws into the wall fitting (the escutcheon plate – that’s the decorative cover). Turn it counter-clockwise. You might need to gently pry the escutcheon plate away from the wall slightly to get your wrench on the threaded pipe. Hold the plate steady with one hand if needed.
- Unscrew Everything: Once loosened, you should be able to unscrew the shower arm by hand. Let any residual water drain into your bucket or onto your towels.
If the old shower arm is really stubborn, don’t force it too hard. A little penetrating oil might help, but be sure to wipe it off thoroughly before installing the new one.
Step 2: Clean the Shower Arm Fitting
Inside the hole where the shower arm was, you’ll see a threaded pipe fitting. This is where your new arm will screw in.
- Remove Old Tape: Carefully remove any old plumber’s tape or pipe dope from the threads. You can use a soft cloth or an old toothbrush.
- Inspect:** Check the threads for any damage or debris. Clean them gently.
Clean threads ensure a good seal, preventing leaks down the road. It’s the little things that make a big difference!
Step 3: Prepare and Install the New Shower Arm
Now for the new hardware! Make sure your new shower arm and the threads where it connects to the wall are clean.
- Apply Plumber’s Tape: Take your plumber’s tape. Start at the end of the threads that will screw into the wall. Wrap the tape around the threads AGAINST the direction they will be tightened. So, if you’re turning it clockwise to tighten, wrap the tape counter-clockwise. Wrap it around 3-4 times, overlapping slightly. Press the tape firmly into the threads.
- Screw in the New Arm: Carefully thread the new shower arm into the fitting in the wall. Hand-tighten it first. Once it’s snug, use your adjustable wrench to give it about a quarter turn more. Don’t overtighten! You want it secure, but brute force can damage the fitting behind the wall.
- Position the Escutcheon Plate: Slide the decorative escutcheon plate over the shower arm until it sits flush against the tile or wall. This covers up the hole and looks nice.
A good rule of thumb for tightening is “snug plus a quarter turn.” Trust your feel for it.
Step 4: Attach the 16″ Shower Head
This is the exciting part! Your large shower head is about to connect.
- Prepare the Shower Arm Threads: Apply plumber’s tape to the threads on the end of the new shower arm, just like you did for the wall fitting. Wrap it in the opposite direction of tightening.
- Screw on the Shower Head: Align your 16-inch shower head with the threads on the shower arm. Screw it on clockwise by hand until it’s snug.
- Final Tightening: Most shower heads are designed to be hand-tightened. However, if the instructions say to use a wrench, use your adjustable wrench (with a cloth to protect the finish) for a final, gentle snug-up – usually no more than a quarter turn past hand-tight.
Many modern shower heads have a ball joint where they connect to the arm. This allows you to adjust the angle. Make sure it’s oriented correctly before the final tightening.
Step 5: Hand-Tighten Everything and Check Alignment
Before turning the water back on, double-check everything.
- Check Shower Head Angle: Make sure your shower head is pointing in the direction you want it to.
- Ensure Arm Stability: The shower arm should feel secure against the wall, with the escutcheon plate covering the hole properly.
A little bit of adjustment now saves a lot of fuss later.
The Moment of Truth: Testing for Leaks
Now, let’s see if everything holds up!
- Turn Water Back On: Slowly turn the water shut-off valve back on.
- Check Connections: Immediately check the connection at the wall fitting and where the shower head meets the arm. Look and feel for any drips or moisture.
- Run the Shower: Turn on the shower for a minute. Check again for leaks. Adjust the flow to hot and cold.
If you see any small drips, try tightening the connection slightly (just a tiny turn). If a persistent leak continues, you might need to unscrew it, reapply plumber’s tape, and try again. It’s common to need a slight adjustment.
For a deeper dive into plumbing basics, understanding water pressure and flow is helpful. Many local utility companies offer resources, or you can check out sites like the National Association of Home Builders (NAHB) for general home improvement information.
Troubleshooting Common Issues
Even with the best intentions, sometimes things don’t go perfectly. Here are a few common snags and how to fix them.
Problem: Water Leaking from the Shower Arm Wall Connection
Cause: Insufficient plumber’s tape or tape applied incorrectly. The fitting might not be tightened enough.
Solution: Turn off the water. Unscrew the shower arm. Remove the old tape. Reapply plumber’s tape, ensuring it’s wrapped snugly in the correct direction (opposite of tightening). Reinstall the arm and tighten securely (but don’t overtighten). If it’s still leaking, check the threads for damage.
Problem: Shower Head Angled Incorrectly or Loose
Cause: Not tightened enough, or the ball joint is loose.
Solution: Hand-tighten the shower head more firmly. If it continues to be loose or angled poorly, check if your shower head has a locking mechanism or if the ball joint can be tightened with a tool (consult your manual). Be gentle to avoid cracking plastic parts.
Problem: Low Water Pressure from the New Shower Head
Cause: Many modern shower heads have flow restrictors to save water. Debris might be blocking the head. The shut-off valve might not be fully open.
Solution: Check your shower head’s manual. Many flow restrictors can be removed (though this may affect water conservation efforts). Rinse the shower head itself by soaking it or running water through it in reverse. Ensure the main water shut-off valve is fully open.
Problem: Old Escutcheon Plate Won’t Fit Nicely
Cause: The new shower arm has a different diameter, or the old escutcheon is damaged/discolored.
Solution: You may need to purchase a new, compatible escutcheon plate. These are readily available at hardware stores.
When to Call a Pro
While this DIY installation is often straightforward, there are times when it’s best to call in a professional plumber:
- If You Can’t Find or Operate the Shut-Off Valve: Water damage can be costly. If you’re unsure about shutting off the water safely, a plumber can handle this.
- If the Pipe Fitting Behind the Wall is Damaged: If the threaded pipe in the wall is corroded, cracked, or spins freely when you try to remove the old arm, this indicates a bigger issue that requires professional repair.
- If You Encounter Unexpected Leaks You Can’t Fix: If you try the troubleshooting steps and still have leaks, it’s wise to get expert help to prevent water damage.
- If You’re Replacing the Entire Valve System: Installing a new shower valve behind the wall is a more complex job that often requires specialized tools and knowledge.
Don’t feel discouraged if you need a pro! It’s always better to ensure the job is done right and avoid potential bigger problems.
Pros and Cons of a 16″ Shower Head
Like any home upgrade, there are benefits and things to consider.
| Pros | Cons |
|---|---|
| Luxurious, spa-like showering experience | Can use more water if not a low-flow model (check ratings) |
| Provides excellent full-body coverage | May require a stronger supported shower arm, especially for heavier heads |
| Can be visually striking and enhance bathroom aesthetics | Initial cost might be higher than standard shower heads |
| Many modern designs are water-efficient | Installation might require specific adapter fittings depending on your existing plumbing |
Frequently Asked Questions (FAQ)
Q1: Will a 16-inch shower head fit any shower arm?
A: Most shower heads, including 16-inch ones, connect to a standard 1/2-inch IPS (Iron Pipe Size) shower arm. The main consideration is whether your existing shower arm can support the weight and size of the larger head. Most modern shower arms are sufficient, but it’s good to check the specifications for both your new shower head and shower arm.
Q2: Do I need to turn off the water at the main valve?
A: It’s always the safest bet. While some people have individual shut-off valves for their bathroom, these are not always present or reliable. Turning off the main water supply guarantees no water will come out when you disconnect the old shower arm, preventing potential messes and water damage.
Q3: How much plumber’s tape do I need?
A: Usually, 3-4 wraps of plumber’s tape are sufficient. Wrap it snugly around the threads in the direction opposite to how you’ll tighten the fitting. This helps create a watertight seal. Don