

Quick Summary
Getting plumbing to install a washing machine in Melbourne is straightforward with the right steps. This guide covers everything from essential tools and materials to connection types and professional tips for a smooth, watertight installation.
Hey everyone, Nazmul Hasan here. You know how it is with washing machine installations – sometimes they’re a breeze, and other times, a simple appliance hookup can turn into a leaky nightmare if the plumbing isn’t right. For appliance plumbers in Melbourne, getting these connections spot-on is key to happy customers and avoiding those dreaded call-backs.
Whether it’s a brand-new install or a replacement, understanding the plumbing side of things is crucial. We’re talking about the water supply, the drain, and making sure everything is sealed up tight. It’s not just about plugging things in; it’s about doing it professionally and safely.
This guide is designed to walk you through the entire process, step-by-step. We’ll cover the essential plumbing aspects, so you can tackle these jobs with confidence. Ready to get started? Let’s dive into what you need to know.
Essential Plumbing Tools and Materials for Washing Machine Installation
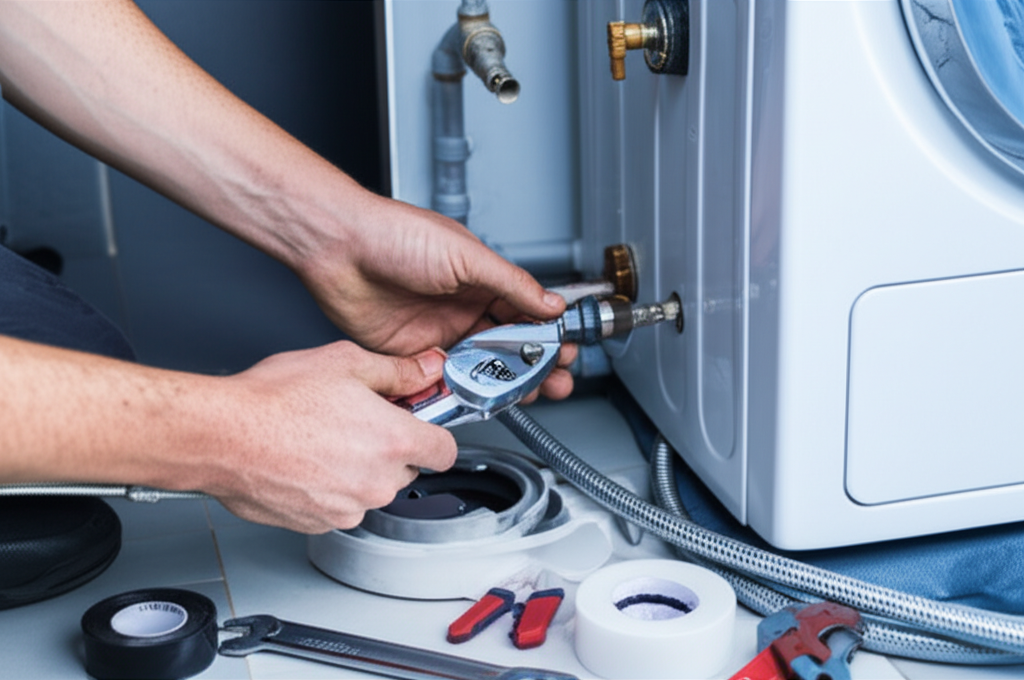
Before you even think about turning on the water, having the right gear on hand makes all the difference. For a washing machine installation in Melbourne, there’s a standard toolkit that’s going to make your job smoother and much more efficient. These aren’t exotic items; they’re the bread and butter of plumbing work, but using them correctly is what matters.
Let’s break down what you’ll need to have ready. This list focuses on the plumbing side of the installation, assuming the washing machine itself is ready to go.
Tools You’ll Need
- Adjustable Wrenches (Pipe Wrenches): You’ll need a couple of these, in varying sizes, for tightening and loosening fittings and valves. Having a good grip is crucial to prevent leaks.
- Plumber’s Tape (PTFE Tape): This is your best friend for sealing threaded connections. Wrap it around the threads a few times (clockwise, mind you) to ensure a watertight seal.
- Pliers (Slip-Joint and Channel-Lock): Useful for gripping and manipulating pipes and fittings, especially in tight spots.
- Bucket and Towels: Always have these handy. Even with careful work, there will be a little water. Be prepared to catch it and clean up any drips.
- Utility Knife or Pipe Cutter: For cleanly cutting any necessary piping or flexible hoses. A clean cut prevents stress on connections.
- Thread Sealant/Paste (Optional but Recommended): Sometimes, for extra security on certain fittings, a pipe dope can be used in conjunction with or instead of PTFE tape.
- Spirit Level: To ensure the washing machine is installed level. An unbalanced machine can vibrate excessively and cause plumbing issues over time.
- Safety Glasses and Gloves: Protecting yourself should always be the top priority on any job site.
Materials You’ll Likely Use
- Washing Machine Hoses (Supply Lines): Most modern machines come with these, but always check their condition. Stainless steel braided hoses are generally more durable than rubber ones. You might need lengths for hot and cold water.
- Drain Hose Connector/Clamp: This attaches the washing machine’s drain hose to your standpipe or drain connection. Make sure it’s a snug fit.
- Shut-off Valves (Angle Stops or Straight Stops): If existing valves are old, corroded, or missing, you’ll need to install new ones for both the hot and cold water supply lines. These are critical for maintenance and emergencies.
- Flexible Drain Hose Extension (if needed): Sometimes the supplied drain hose isn’t long enough. Ensure any extension is compatible and securely connected.
- Saddle Valve (for older systems, use with caution): While sometimes used to tap into existing water lines, these are generally discouraged for critical supplies like washing machines due to potential leak points. Modern installations typically use dedicated shut-off valves.
Having these tools and materials ready means you can move through the installation swiftly and professionally. It cuts down on trips back to the van and ensures you’re equipped for common scenarios.
Understanding Washing Machine Water Supply Connections
The water supply is arguably the most critical part of a washing machine plumbing job. Get this wrong, and you’re looking at leaks, potential water damage, and a very unhappy customer. In Melbourne, like elsewhere, we need to ensure reliable hot and cold water delivery to the machine.
Types of Water Supply Connections
You’ll typically encounter two main ways to connect your washing machine’s water supply:
- Direct Connection to Existing Stops: This is the most common and straightforward method. You’ll connect your washing machine’s supply hoses directly to the existing hot and cold water shut-off valves (often called angle stops or straight stops) behind the machine.
- Installing New Shut-off Valves: If there are no existing valves, or if they are in poor condition, you’ll need to install new ones. This usually involves cutting into the existing hot and cold water supply pipes and soldering or crimping on new valve fittings.
The Connection Process (Step-by-Step)
Let’s assume you’re working with existing, functional shut-off valves.
- Turn Off the Water Supply: This is non-negotiable. Locate the main water shut-off valve for the property or, if available and functional, shut off the hot and cold water supply specifically to the washing machine area.
- Inspect Existing Valves: Check the current shut-off valves. Are they stiff? Do they drip? If there’s any doubt, it’s best practice to replace them as part of the installation.
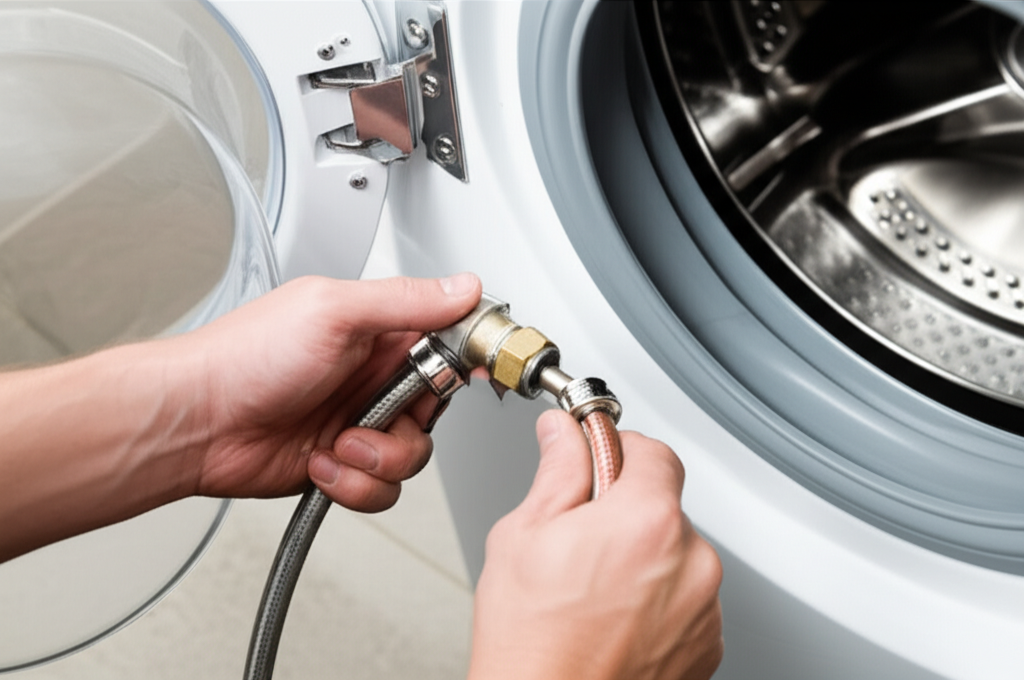
- Prepare the Hoses: Most washing machine supply hoses have one end for the machine (usually straight) and one for the water stop (often an elbow). Ensure the rubber washers are present and correctly seated in the hose fittings.
- Apply Plumber’s Tape: For the threaded connection to the shut-off valve, wrap PTFE tape around the valve’s outlet threads 3-4 times in a clockwise direction. This creates a seal against the threads.
- Connect the Hoses: Screw the appropriate hose end onto the corresponding hot and cold water shut-off valve. Hand-tighten first, then use an adjustable wrench to give it about a quarter to half-turn more. Don’t overtighten, as this can damage the fitting or washer.
- Connect to the Washing Machine: Connect the other ends of the supply hoses to the correct hot and cold water inlets on the back of the washing machine. Again, hand-tighten and then snug up with a wrench.
- Turn Water On and Check for Leaks: Slowly turn the water supply back on at the shut-off valves. Watch very closely at all connection points for any drips or seeps. If you see any, turn the water off immediately and tighten the fitting slightly.
- Run a Test Cycle: Once you’re confident there are no leaks, run a short wash cycle to ensure water is flowing correctly to and from the machine and that there are no leaks under pressure.
Best Practices for Supply Lines
- Use Stainless Steel Braided Hoses: These are far more robust than standard rubber hoses and greatly reduce the risk of bursting, which can cause severe water damage.
- Replace Old Hoses: If the hoses are more than 5 years old, or show any signs of wear, cracking, or bulging, replace them. It’s cheap insurance against disaster.
- Don’t Kink Hoses: Ensure hoses have a gentle bend and aren’t kinked or crushed behind the machine. A kink restricts flow and can weaken the hose.
- Leave Some Slack: Don’t pull the machine too tight against the wall. Give the hoses a little slack so they aren’t under constant tension.
Properly connecting the water supply is foundational. Taking the time to do it right prevents issues and builds a reputation for quality work.
Washing Machine Drain Plumbing: Preventing Backups and Odours
The drain plumbing for a washing machine is just as vital as the supply lines. If water can’t escape efficiently, or if the drain setup is wrong, you’ll have a messy overflow or foul smells entering the laundry area. For appliance plumbers in Melbourne, understanding the different drain configurations and how to connect them correctly is essential.
Drainage Options in Melbourne Homes
You’ll encounter a few common types of washing machine drain setups:
- Standpipe: This is a vertical pipe, usually 1.5 to 2 inches in diameter, that extends from the floor or wall, typically between 30 and 42 inches (75-107 cm) above the floor. The washing machine’s drain hose simply tucks into this pipe. This is the most common and generally the best method.
- Sink Tailpiece Connection: In some setups, the washing machine drain hose is routed into a special fitting attached to the plumbing beneath a laundry sink. This requires a diversion fitting designed for this purpose.
- Direct Floor Drain: Less common, and often not to code for new installations, is a direct connection to a floor drain. This typically means the drain hose is secured near the floor drain opening.
Connecting the Drain Hose
We’ll focus on the most common: connecting to a standpipe.
- Ensure Proper Standpipe Height: The top of the standpipe must be at least 30 inches (75 cm) and no more than 42 inches (107 cm) from the floor. This height is critical; if it’s too low, water can siphon out of the machine. If it’s too high, the machine’s pump might struggle. Check your washing machine’s manual for specific height recommendations.
- Secure the Drain Hose: The U-shaped end of the washing machine’s drain hose needs to be inserted into the standpipe. Most machines come with a curved plastic piece or a clamp to hold the hose in place and prevent it from falling out.
- Use a Hose Clamp (Recommended): Even if your machine came with a clip, it’s good practice to secure the drain hose to the standpipe with a hose clamp. This ensures a snug fit and prevents the hose from dislodging during high-pressure drain cycles.
- Avoid Sealing the Hose in the Pipe: Never seal the drain hose tightly inside the standpipe. There needs to be an air gap. This prevents siphoning and allows air to enter the drain line, preventing gurgling and potential backups. The air gap also helps prevent sewer gases from entering the laundry room.
- Check for Obstructions: Before connecting, look down the standpipe with a flashlight to ensure there are no blockages.
- Test the Drain Function: After the installation, run a drain and spin cycle on the washing machine. Watch to ensure water drains freely and there are no leaks or overflows at the connection point.
Dealing with Sink Tailpiece Connections
If you’re connecting to a sink tailpiece:
- Install a Y-Fitting or Diverter: The drain hose needs to connect to a dedicated fitting that branches off the sink’s drain pipe. Ensure this fitting is properly installed and watertight.
- Secure the Hose: Use a clamp to firmly attach the washing machine drain hose to the tailpiece fitting.
- Proper Slope: Ensure the drain hose has a continuous downward slope from the washing machine to the tailpiece connection to allow for gravity drainage.
- Avoid Submerging the Hose: The end of the drain hose should not be submerged in standing water within the sink trap.
Tips for a Reliable Drain System
- Ensure Adequate Drain Rate: The standpipe or drain connection needs to be large enough to handle the volume of water the washing machine pumps out. A standard 1.5-inch diameter standpipe is usually sufficient.
- Prevent Siphoning: As mentioned, the air gap is crucial. If you’re using a drain hose extension, ensure any new connection also allows for an air gap.
- Avoid Long, Flat Runs: Keep drain hose runs as short and direct as possible. Long, horizontal runs can lead to clogs.
- Regular Cleaning: Advise customers to periodically clean their washing machine’s drain filter to prevent lint and debris from entering the drain system.
A properly configured drain system ensures efficient water removal and prevents common plumbing headaches associated with washing machine installations.
Washing Machine Plumbing Codes and Regulations in Melbourne
While we’re appliance plumbers focusing on the practical installation, it’s wise to be aware of the general plumbing standards and regulations that apply in Melbourne. While specific building codes are complex, understanding the core principles for washing machine hookups ensures safety and compliance. These aren’t meant to be a substitute for official Victoria Building Authority (VBA) guidelines, but they highlight key areas.
The Plumbing Regulations 2018 (Victoria) govern plumbing work across the state. For appliance installations, key considerations often revolve around:
Water Supply Requirements
- Backflow Prevention: While not always mandatory for flexible washing machine hoses connecting to standard taps, if you’re making more permanent connections or dealing with specific water types, understanding backflow prevention is important. The goal is to stop contaminated water from flowing back into the potable water supply. You can find more on this from the Victorian Building Authority (VBA).
- Material Standards: Ensure all pipes, fittings, and hoses used for water supply meet Australian Standards (e.g., AS/NZS 3500 for plumbing and drainage). This includes using hoses rated for potable water and the correct pressure.
Drainage Requirements
- Trap Requirements: Washing machine standpipes should ideally connect to a trap (a P-trap or similar) to prevent sewer gases from entering the premises. If draining into a sink tailpiece, the sink’s existing trap usually covers this.
- Air Gaps: As stressed before, an air gap is crucial between the drain hose and the standpipe or drain receptor. This is usually mandated to prevent siphoning and contamination.
- Pipe Sizing and Gradients: Drain lines must be adequately sized and sloped correctly (typically a 1:40 or 1:80 gradient for stormwater and sanitary drainage) to ensure efficient flow and prevent blockages.
- Access for Maintenance: The installation should allow for reasonable access to the drain connection for cleaning and maintenance if needed.
General Safety and Installation Practices
- Licensed Plumber: In Victoria, any plumbing work must be performed by a licensed plumber. As appliance plumbers, you are working under this umbrella, ensuring your work meets the required standards.
- Manufacturer’s Instructions: Always follow the washing machine manufacturer’s specific installation guidelines, as they often incorporate critical safety and operational requirements.
- Testing: All new plumbing work must be tested for leaks and proper function before being put into service.
Where to Find More Information
For the most accurate and up-to-date information, always refer to:
- The Victorian Building Authority (VBA) website.
- Australian Standards, particularly AS/NZS 3500.
- Local council regulations, which may have specific requirements.
Staying informed about these regulations helps ensure your installations are not only functional but also safe, compliant, and meet the high standards expected in Melbourne.
Troubleshooting Common Washing Machine Plumbing Issues
Even with the best effort, you might run into a few snags during or after a washing machine installation. Knowing how to quickly diagnose and fix common plumbing issues will save you time and impress your clients. Here are a few scenarios you might face and how to handle them.
Issue 1: Leaking Water Supply Hoses
- Cause: Loose connection, damaged hose washer, damaged hose itself, or overtightened fitting.
- Solution:
- Turn off the water supply immediately.
- Gently tighten the connection. If still leaking, disconnect the hose.
- Check the rubber washer inside the hose fitting – ensure it’s present, seated correctly, and not cracked or deformed. Replace if necessary.
- Inspect the hose for any visible damage. Replace old or worn hoses proactively.
- Reconnect and hand-tighten, then snug with a wrench (about 1/4 to 1/2 turn).
- Turn water back on slowly and check again.
Issue 2: Water Not Filling or Slow Filling
- Cause: Shut-off valves not fully open, kinked supply hoses, clogged inlet screens, or low water pressure.
- Solution:
- Ensure both hot and cold shut-off valves are fully open.