

Quick Summary:
Learn how to leak test plumbing effectively with these essential tips. This guide provides straightforward steps to identify and fix leaks, ensuring reliable appliance installations and preventing costly call-backs. Master this crucial skill to boost your confidence and your customers’ satisfaction.
Hey guys, Nazmul here. We’ve all been there: a fresh appliance install, everything looks good, but then you hear it – that tell-tale drip. Finding and fixing plumbing leaks quickly and reliably is a cornerstone of our job. It’s not just about stopping water waste; it’s about protecting property, ensuring appliance longevity, and most importantly, avoiding those dreaded callbacks that eat into our profits and reputation. A leaky connection on a water heater or washing machine can cause serious damage if not caught early. This article is packed with job-tested techniques to help you master leak testing, making sure every connection you make is solid, safe, and sound. We’ll break down exactly what you need to know, from the initial checks to the final confirmation, so you can tackle any leak testing scenario with confidence.
Why Leak Testing is Non-Negotiable
In the world of appliance plumbing, a leak isn’t just an inconvenience; it’s a potential disaster waiting to happen. Water damage can lead to mold growth, structural rot, and significant repair bills for homeowners. For us, a persistent leak means returning to the job at our own expense, redoing work, and damaging our reputation. That’s why implementing a rigorous leak testing procedure for every installation and repair is absolutely essential. It’s about doing the job right the first time, every time.
Think about it: a small drip from a compression fitting under a sink might go unnoticed for weeks, silently wreaking havoc. Or a faulty seal on a dishwasher supply line could flood a kitchen overnight. These scenarios are preventable. By understanding the common causes of leaks and having a systematic approach to testing, you can significantly reduce the risk. This isn’t just good practice; it’s a fundamental requirement for ensuring the safety and reliability of the plumbing systems we work on.
Our goal is to deliver installations that are not only functional but also durable and leak-free. This means going beyond just visual checks. It involves applying pressure, observing carefully, and using the right tools and techniques to expose any potential weaknesses. Mastering leak testing is a critical step in building that reputation for quality work that appliance plumbers strive for. It’s the difference between a job well done and a job that comes back to bite you.
Common Sources of Plumbing Leaks
Before we dive into how to test, it’s crucial to understand where leaks typically hide. Knowing the common culprits helps you focus your testing efforts and diagnose issues faster. Most leaks in appliance plumbing stem from a few key areas:
- Connection Points: This is hands down the most common source. Think about threaded fittings, compression fittings on supply lines, and connections to the appliance itself. Improper tightening, cross-threading, or using old/damaged gaskets are frequent offenders.
- Faulty Gaskets and Seals: Many appliances and fittings rely on rubber or silicone seals to prevent water from escaping. Over time, these can degrade, crack, or become dislodged, leading to leaks. This is common on water heater elements, pump seals, and valve seats.
- Damaged or Worn-Out Supply Lines: Flexible hoses connecting appliances to the water supply can become brittle, kinked, or develop pinhole leaks, especially if they’re old or were installed improperly. Braided stainless steel lines are robust but not indestructible.
- Pipework Issues: While less common with new appliance installations, older piping, or damage during installation could lead to leaks. This can include cracked PVC, corroded copper, or faulty soldered joints.
- Appliance Internal Failures: Sometimes, the leak isn’t in the installation but within the appliance itself. This could be a faulty internal valve, a cracked tank, or a worn-out pump.
Recognizing these common failure points allows you to be more proactive. When you install or repair, pay extra attention to these areas. Ask yourself: “Could this connection point fail?” or “Is this seal in good condition?” This preventative mindset, combined with thorough testing, is what separates a good plumber from a great one.
Essential Tools for Leak Testing
You don’t need a truckload of fancy gadgets to effectively leak test plumbing. A few key tools will make the job significantly easier and more reliable. Here’s what I always keep on hand:
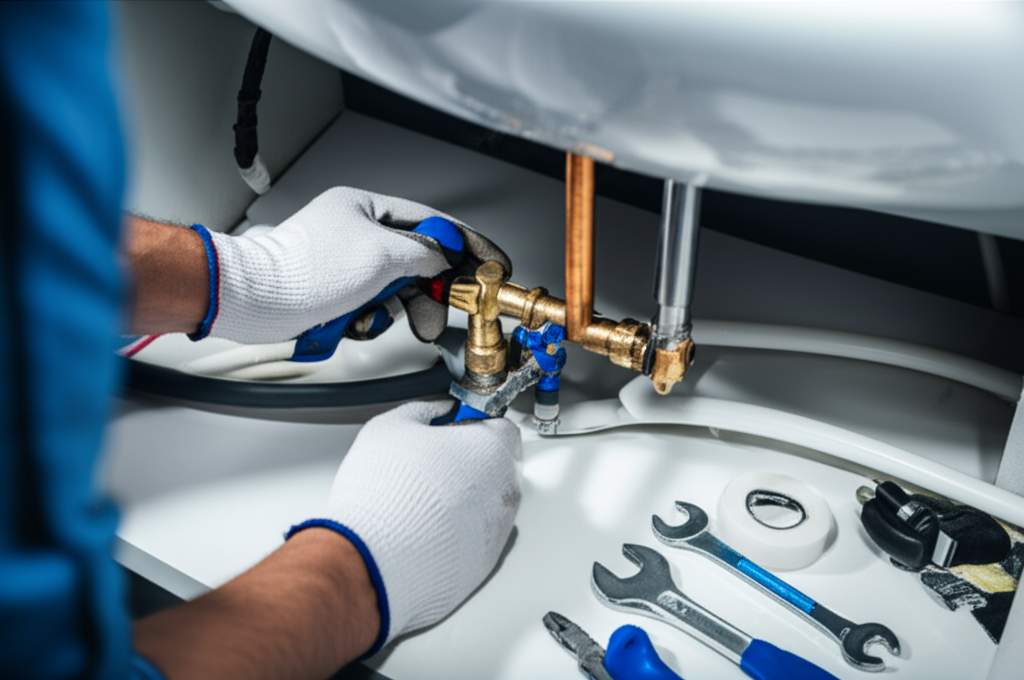
- Adjustable Wrenches (Pipe Wrenches are great too!): Essential for tightening various fittings. Having a couple of different sizes ensures you can get a good grip on most nuts and couplings.
- Pliers (Channel Locks/Groove Joint Pliers): Versatile for gripping, turning, and holding.
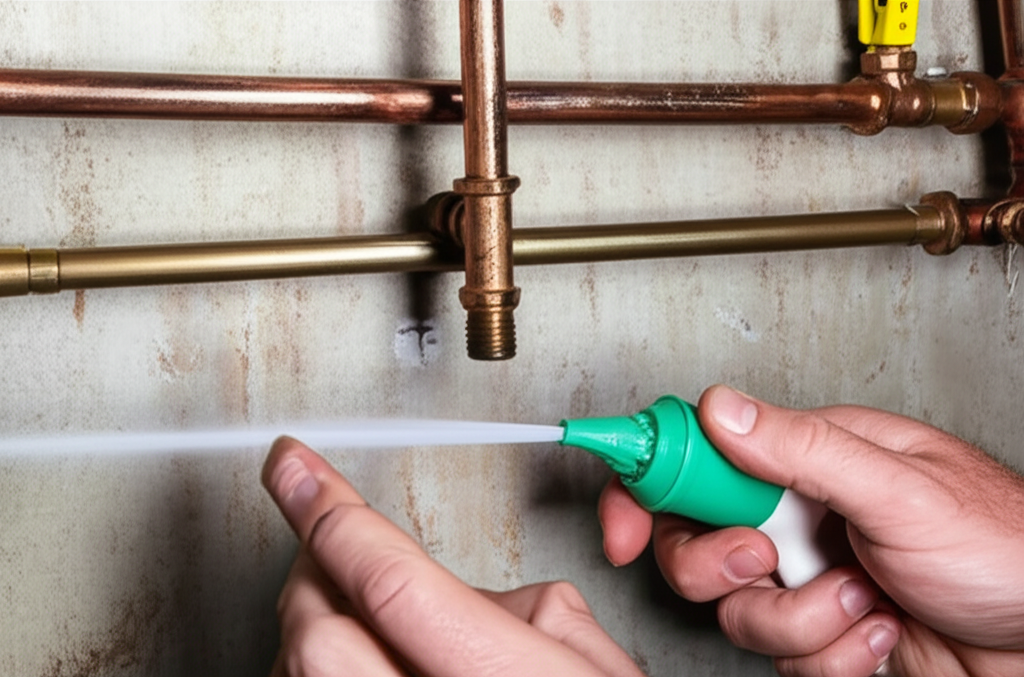
- Teflon Tape (PTFE Tape) or Pipe Dope: Crucial for sealing threaded connections. Always use the right type for the job – some are for water, others for gas.
- Bucket or Towels: To catch drips during testing and for general cleanup.
- Flashlight: Essential for brightly lit inspections of dark, hard-to-reach areas under sinks or behind appliances.
- Dry Rag: For wiping down connections to make small drips more visible.
- Optional: Leak Detector Fluid or Dye: For those really tricky, intermittent leaks, a UV light and dye can pinpoint the exact source when water alone isn’t giving it away.
- Pressure Gauge (for specific systems): If you’re dealing with larger systems or need to confirm pressure integrity, a gauge is invaluable.
The quality of your tools matters. Well-maintained wrenches and readily available sealant ensure you’re not fumbling around mid-job. Proper technique with these tools is equally important, which we’ll get to.
Step-by-Step Guide: How to Leak Test Plumbing
Here’s the systematic approach I use after making any plumbing connections for an appliance. Follow these steps, and you’ll catch almost every potential leak before it becomes a problem.
Step 1: Visual Inspection Before Pressure
Before you even turn on the water, do a thorough visual check. Look for:
- Damaged Threads: Are there any burrs or cross-threading on the fittings?
- Cracked Fittings or Pipes: Inspect for any visible damage.
- Proper Seating: Ensure gaskets or seals are correctly in place and not deformed.
- Correct Alignment: Are the pipes and fittings straight and not under undue stress?
This initial check can save you a lot of time. Sometimes the problem is obvious right from the start.
Step 2: Prepare the Area
Place a bucket or absorbent towels under the connections you’ll be testing. This will catch any immediate drips and make it easier to spot small leaks later.
Step 3: Apply Sealant (if applicable)
For threaded connections, ensure you’ve applied Teflon tape or pipe dope correctly. Wrap tape clockwise around the threads. Use pipe dope according to its instructions. This creates a watertight seal.
Step 4: Introduce Water SLOWLY
This is crucial. Don’t just blast the water on at full pressure. Slowly open the nearest shut-off valve to introduce water into the system. Listen for any unusual noises (like spraying water) and watch the connections intently.
Step 5: Initial Connection Check
Once water is flowing, immediately put your eyes and hands on every connection point you worked on. Use a dry rag to wipe each fitting and connection. Even tiny beads of moisture will show up clearly on a dry surface.
- Feel around the fitting with your hand.
- Wipe each connection point and observe the rag for dampness.
Step 6: Apply Slight Pressure & Observe
Gently tighten any fittings that feel loose. Be careful not to overtighten, which can damage threads or seals. Water pressure will help seat seals. Let the system sit under normal operating pressure for a few minutes. Continue to monitor the connections.
Step 7: Cycle the Appliance (if applicable)
If you’re testing an appliance (like a dishwasher, in an under-sink setup, or a washing machine), run it through a short cycle. This will put the plumbing under its typical working pressure and temperature fluctuations, which can expose leaks that might not appear under static pressure.
- For washing machines, run a short fill and drain cycle.
- For dishwashers, initiate a quick wash cycle.
- For water heaters, let it fill and then heat up.
Step 8: Thorough Re-inspection (After Cycling)
After the appliance has run for a bit and then drained, re-inspect all connections again. Wipe them down with a dry rag and look closely. Leaks often show up after pressure changes or temperature variations.
Step 9: Extended Observation Period
For critical installations, or if you suspect a very slow leak, I recommend leaving the area undisturbed for a period. Check back after 30 minutes, an hour, or even a few hours. Sometimes, slow drips only become apparent after prolonged exposure to pressure.
Step 10: Final Confirmation
Once you’ve gone through all the steps and observed no signs of moisture, you can be confident in your work. Documenting your testing process can be a good business practice, particularly on larger jobs.
Testing Different Types of Plumbing Systems
While the core principles of leak testing remain the same, the specific application can vary. Here’s a look at how you might approach leak testing for common appliance plumbing scenarios:
Dishwasher Supply Lines
Common Setup: Typically connects to a hot water shut-off valve under the sink using a flexible braided stainless steel supply line and a compression fitting or threaded adapter.
Testing Method:
- Install the supply line, ensuring the rubber washer is correctly seated in the connector. Hand-tighten, then give it a quarter to half turn with a wrench.
- Slowly turn on the hot water shut-off valve.
- Wipe the connection at the valve and at the dishwasher inlet with a dry rag.
- Run the dishwasher through a short rinse cycle. Pay attention to the fill and drain phases.
- Re-inspect all connections after the cycle.
Key Things to Watch For: Leaks at the shut-off valve connection, leaks at the dishwasher inlet connection, and leaks within the braided hose itself (though less common).
Washing Machine Supply Hoses
Common Setup: Connects to hot and cold water valves behind the washing machine using flexible hoses (rubber or braided steel).
Testing Method:
- Ensure hoses are securely attached to both the valves and the appliance inlets. These are usually hand-tight plus a quarter turn.
- Turn on both hot and cold water valves slowly.
- Wipe down all four connection points (two at the wall, two at the machine) with a dry rag.
- Run the machine through a fill/drain cycle.
- Check all connections again after the cycle completes.
Key Things to Watch For: Leaks at the valve connections, leaks at the machine connections, and kinks or damage in the hoses.
Under-Sink Water Filters & Ice Maker Lines
Common Setup: Often involves smaller diameter copper or PEX tubing connected via compression fittings to a specific tap or valve, or directly to an appliance like a refrigerator.
Testing Method:
- Ensure compression fittings are properly seated and tightened. For compression fittings, hand-tighten, then tighten the nut a specific number of turns as per manufacturer instructions (often 1/2 to 1 full turn beyond hand-tight, but check your fitting type).
- Slowly turn on the water supply.
- Inspect compression fittings meticulously. Wipe each one.
- For refrigerators, allow the water line to fill and then check the connection at the back of the fridge by pulling it out slightly if needed.
- Run water through the filter or ice maker to ensure flow and check for leaks under pressure.
Key Things to Watch For: Leaks at compression nut connections, especially if the tubing wasn’t deburred or seated properly. Leaks where the line connects to the main water supply.
Water Heater Connections
Common Setup: Can involve NPT threaded connections for flex lines or dielectric unions, or soldered copper joints.
Testing Method:
- Ensure all threaded connections are properly sealed with tape/dope and tightened appropriately.
- Ensure any dielectric unions are correctly installed.
- Slowly fill the water heater, letting air escape from the relief valve or a hot water faucet until a steady stream of water flows.
- Inspect all fittings connecting to the heater (inlet, outlet) and any valves.
- Once filled, let the heater start its heating cycle and monitor for leaks, especially around heating elements or gaskets once the tank is hot and under pressure.
Key Things to Watch For: Leaks at the inlet/outlet nipples, around heating element gaskets, and at the temperature and pressure relief valve.
Table: Common Leak Symptoms and Solutions
Here’s a quick reference chart to help diagnose and resolve common leak issues encountered during testing:
| Symptom | Likely Cause | Solution |
|---|---|---|
| Drip from threaded connection | Loose fitting, insufficient or improperly applied sealant (tape/dope), damaged threads. | Gently tighten fitting. If still leaking, shut off water, disassemble connection, clean threads, reapply sealant correctly, and reassemble. |
| Moisture around compression fitting | Nut not tight enough, tubing not seated against the ferrule, damaged ferrule, debris on tubing or fitting seat. | Tighten nut (follow manufacturer’s spec – usually 1/2 to 1 turn past hand-tight). If still leaks, disassemble, clean, check ferrule, reassemble. For new installations, ensure tubing is cut square and deburred. |
| Leak from flexible supply line connector | Loose connection, damaged washer/gasket, cross-threaded connection. | Tighten connection. If still leaks, shut off water, disassemble, inspect and replace the washer if damaged. Check for cross-threading. |
| Pinhole leak in supply hose | Defective hose, physical damage, age/wear. | Replace the entire supply hose. Inspect for sharp edges or pinch points that might have caused the damage. |
| Leak from appliance internal seal (e.g., pump, valve) | Internal component failure, worn gasket/seal. | Diagnose the specific component. May require appliance repair or replacement of the internal part. This is usually beyond the scope of installation leak testing but indicates an appliance issue. |
Advanced Leak Detection Methods
Sometimes, a leak is incredibly subtle, intermittent, or located in a very hard-to-reach spot. When standard visual checks and wiping don’t cut it, there are a few advanced techniques to consider:
Using Leak Detector Fluid/UV Dye
For those truly baffling leaks, a specialized leak detector fluid or UV dye can be your best friend. You add a small amount of the dye to the water system (with the water turned off, then gradually reintroduced). Then, you use a UV flashlight in a darkened area. The dye will visibly fluoresce under the UV light precisely where it’s escaping the system.
Pros: Highly effective for pinpointing minuscule or intermittent leaks.
Cons: Requires purchasing specialized dye and a UV light. Can be messy if not used carefully. May not be suitable for all systems (e.g., if the dye could damage appliance components). Always check dye compatibility.
Pressure Testing (for more robust systems)
While less common for typical appliance hookups, for larger installations or when building code requires it, plumbing systems are sometimes tested under air or water pressure using a test pump. A gauge is attached, and the pressure is maintained for a specific period. Any drop in pressure indicates a leak.
Pros: Confirms the integrity of the entire system, not just visible connections. Required for certain inspections.
Cons: Requires specialized equipment (pressure test pump, gauges). Can be time-consuming. Usually done before final appliance hookup.
Listening for Leaks
Sometimes, the best tool is your ear. After turning on the water, or even during appliance operation, listen very carefully around connections. A small spray