

To plumb air lines in your garage, select a suitable compressor, lay out your system, choose durable piping (like black iron or PEX), connect components with proper fittings, and test for leaks to ensure a reliable compressed air supply for all your tools. Proper planning and execution guarantee efficiency and safety.
Hey fellow tradespeople, Nazmul Hasan here. Ever stand in your garage, ready to tackle a job, only to realize your air compressor setup is a tangled mess or just not cutting it? It’s a common frustration. Running your own air lines in the garage might seem daunting, but with the right approach, it’s a straightforward process that dramatically boosts your workshop’s efficiency. Forget wrestling with short hoses and inadequate pressure. This guide will walk you through, step-by-step, how to plumb an air line system in your garage that’s safe, reliable, and ready for any task. We’ll cover everything from planning and materials to installation and leak testing. Let’s get your shop powered up!
Planning Your Garage Air Line System: More Than Just Hoses
Before we grab any tools, a good plan is crucial. Think of this as the blueprint for your compressed air future. A well-designed system isn’t just about getting air to your tools; it’s about delivering it efficiently, consistently, and safely across your entire garage workspace. We want to avoid common mistakes that lead to pressure drops, leaks, and headaches down the road. This means considering where your compressor will live, how much air your tools actually consume, and the best routes for your piping.
Assessing Your Needs: What Tools Will You Run?
The first step in planning is figuring out what you’ll be using compressed air for. Different tools have vastly different air consumption requirements (measured in CFM – cubic feet per minute). A small brad nailer uses much less air than an impact wrench, a sandblaster, or a paint sprayer. Knowing this helps you pick the right size compressor and design a pipe network that can handle the peak demand without a significant pressure drop.
- Impact Wrenches: Typically require higher CFM and pressure.
- Paint Sprayers: Need a consistent and clean air supply.
- Air Grinders/Sanders: High continuous air usage.
- Tire Inflators/Air Brushes: Lower CFM requirements.
It’s always better to slightly oversize your system than to undersize it. This ensures you have enough air when you need it most and gives you flexibility for future tool upgrades.
Compressor Location: The Heart of the System
Your air compressor is the engine of your air system. Its placement impacts noise levels, accessibility for maintenance, and the length of the main air line. Ideally:
- Ventilation: Compressors generate heat. Place yours in a well-ventilated area, away from direct sunlight and enclosed spaces that can lead to overheating.
- Noise: Compressors can be loud. If noise is a concern, consider a location that minimizes disruption to living areas. Some garages have a separate alcove or closet for the compressor.
- Power Access: Ensure easy access to an appropriate electrical outlet.
- Drainage: Water condensation is a byproduct of compression. Place the compressor where you can easily access its drain valve for regular maintenance.
A common mistake is putting the compressor in a dusty corner where it can overheat and suck in debris, reducing its lifespan. Think about accessibility for oil changes, filter replacements, and draining the tank.
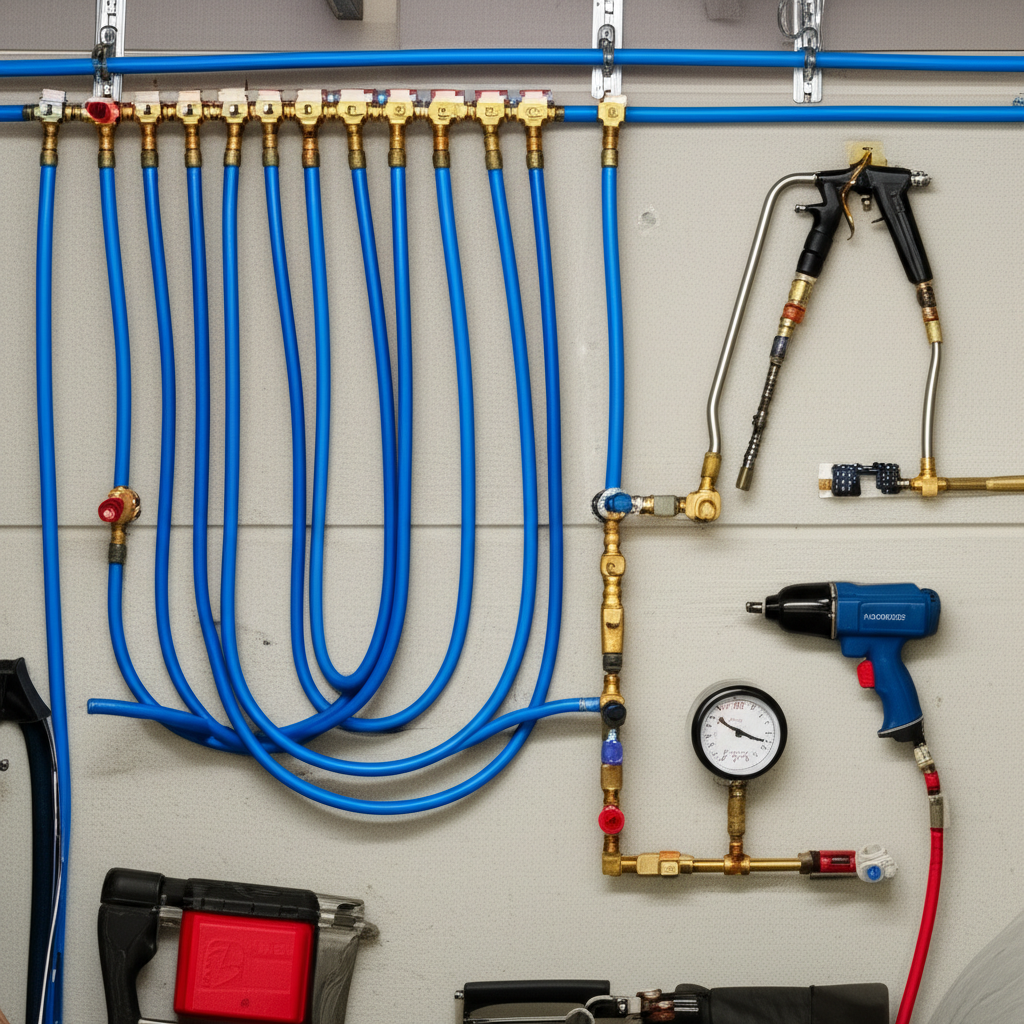
Mapping Your Air Lines: The Road Ahead
Once you know your tool needs and compressor location, it’s time to map out the piping. Consider the layout of your garage – workbench locations, vehicle bays, and any permanent fixtures. The goal is to run lines in a way that minimizes bends and obstructions, and that makes it easy to connect your tools wherever you need them.
Key design considerations:
- Main Distribution Line: This is the primary pipe running from the compressor.
- Drop Downs: Vertical lines that come down from the main line to wall outlets or quick-disconnect fittings.
- Branch Lines: Smaller lines that may extend from the main line to different zones in the garage.
- Slope for Drainage: Importantly, run your main distribution line with a slight slope (about 1/4 inch per 10 feet) towards a low point or a dedicated water-separator/drain. This allows moisture to collect and be easily drained, preventing rust and tool damage.
Sketching this out on paper, noting locations for outlets and drain points, will save you a ton of guesswork and material if you use it as a guide during installation.
Choosing Your Air Line Materials: Durability Matters
The material of your air lines is critical for longevity and performance. You’ll want something that can handle the pressure, resist corrosion, and is relatively easy to work with. There are a few popular options, each with pros and cons.
Option 1: Black Iron Pipe
Black iron pipe has been a standard for compressed air systems for decades. It’s robust, durable, and can withstand high pressures. However, it’s also heavier, requires special tools to cut and thread, and is prone to rust if not properly coated or maintained, especially in humid environments.
Pros:
- Very durable and long-lasting.
- Can handle high pressures.
- Resistant to physical damage.
Cons:
- Heavy and harder to install.
- Requires pipe threading tools and expertise.
- Can rust internally if moisture isn’t managed well.
- More expensive upfront for fittings and labor if hiring out.
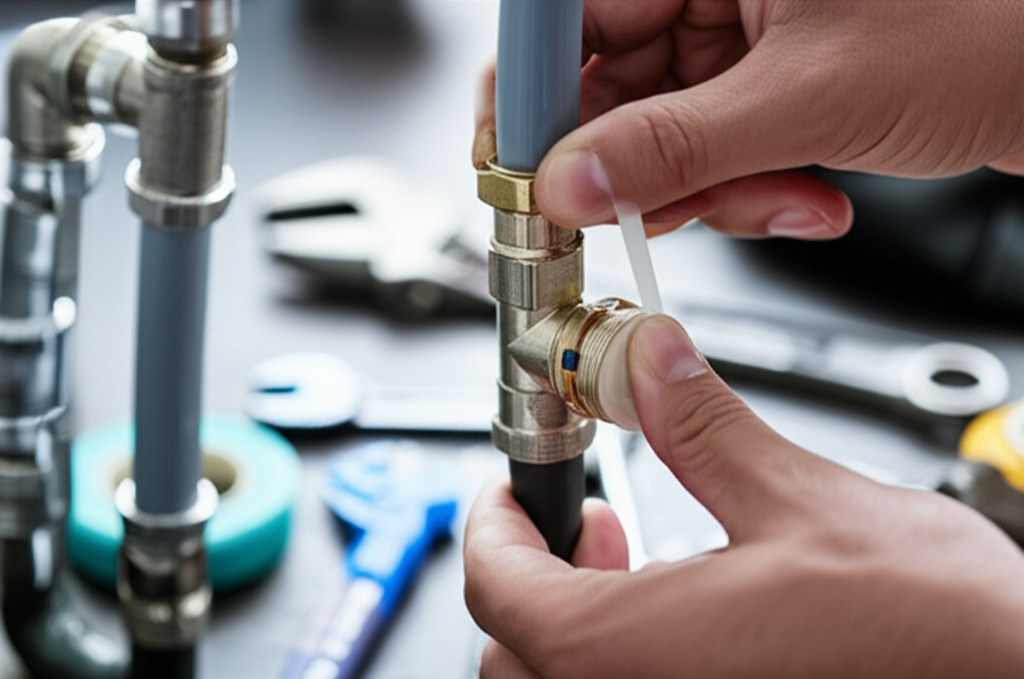
When using black iron, always use pipe dope specifically rated for air lines and ensure all threads are wrapped properly with PTFE tape to prevent leaks.
Option 2: Copper Tubing
Copper is another option, particularly for smaller systems or specific sections. It’s corrosion-resistant and relatively easy to bend. However, for DIY garage systems, it can become expensive, and it’s more susceptible to damage from impacts than steel or PEX.
Pros:
- Corrosion-resistant.
- Easy to bend to navigate around obstacles.
- Clean air delivery.
Cons:
- Can be expensive, especially for larger systems.
- Prone to damage from impacts.
- Requires soldering or special compression fittings.
Option 3: PEX Tubing (Especially PEX-A)
PEX (cross-linked polyethylene) tubing, particularly PEX-A, has become a popular choice for its ease of installation and durability. PEX-A is known for its flexibility and ability to expand, making it more forgiving with freeze/thaw cycles and easier to route. It’s significantly lighter and requires simpler tools than black iron.
Pros:
- Easy to install without special threading tools.
- Flexible, allowing for fewer fittings and easier routing.
- Resistant to corrosion and scale build-up.
- Lighter than metal pipes.
- Good freeze-resistant properties (PEX-A).
Cons:
- Requires specific PEX crimp, clamp, or expansion tools and fittings.
- May not be suitable for extremely high temperatures or pressures depending on the specific PEX type.
- Can be damaged by UV light if exposed to direct sunlight for extended periods.
Make sure to use PEX rated for the pressure and temperature of your compressed air system. For most garage applications, PEX-A in 3/4-inch or 1-inch diameter is an excellent choice. You’ll need PEX fittings and the appropriate crimping/expansion tool.
Option 4: Aluminum or Poly Pipe Systems
These are often sold as kits and are designed specifically for compressed air. They are lightweight, easy to install with push-to-connect fittings or specialized clamps, and non-corrosive. They are a great option for a quick, professional-looking installation.
Pros:
- Very easy and fast installation.
- Lightweight and corrosion-free.
- Often come as complete systems with all necessary fittings.
- Smooth interior reduces pressure drop.
Cons:
- Can be the most expensive option upfront.
- Fittings are often proprietary to the system.
- May be less resistant to physical impact than steel.
For this guide, we’ll focus on PEX and aluminum/poly systems due to their ease of installation for DIY and professional plumbers looking for efficiency. However, the principles apply to black iron as well.
Tools and Materials You’ll Need
Gathering everything before you start is key to a smooth project. Here’s a list of what you’ll likely need:
| Category | Items | Notes |
|---|---|---|
| Piping & Fittings | Air line tubing (PEX, Aluminum, Poly, or Black Iron) | Choose based on your plan, typically 3/4″ or 1″ diameter |
| Elbows (90° and 45°) | For changing direction | |
| Tees | For branching lines | |
| Couplings | For connecting straight sections | |
| End Caps/Plugs | To close off lines | |
| Adapters (e.g., NPT to PEX/Aluminum) | To connect to compressor, regulators, and outlets | |
| Installation Tools | Pipe Cutter (for PEX/Copper) or Hacksaw/Recip Saw with metal blade (for Black Iron) | Ensure clean, straight cuts |
| PEX Crimp/Clamp Tool or Expansion Tool (if using PEX) | Essential for secure PEX connections | |
| Deburring Tool | To clean pipe edges after cutting | |
| Pipe Wrenches (for Black Iron) | For tightening threaded connections | |
| Mounting & Support | Pipe Hangers/Clamps | Galvanized recommended. Spaced appropriately. |
| Screws/Fasteners | Appropriate for your garage structure (wood studs, concrete, etc.) | |
| Safety & Testing | Safety Glasses | Always wear them! |
| Gloves | To protect your hands | |
| Teflon Tape or Pipe Dope (for threaded connections) | Ensure compatibility with air lines | |
| Regulator & Filter/Water Separator | Essential for consistent pressure and clean air | |
| Quick-Connect Couplings | For tool connections (e.g., 1/4″ NPT Industrial) | |
| Pressure Gauge | To monitor system pressure | |
| Soapy Water Solution | For leak testing |
Step-by-Step: Installing Your Garage Air Lines
Now, let’s get hands-on. We’ll walk through the installation process, focusing on PEX and Aluminum/Poly systems as they offer the best balance of ease and performance for most garage setups.
Step 1: Prepare the Compressor Outlet
Your compressor will have an outlet port, usually with NPT (National Pipe Thread) threading. You’ll need an adapter to transition from this NPT thread to your chosen pipe material (e.g., an NPT to PEX adapter, or an NPT to aluminum pipe fitting).
- Clean the threads on the compressor outlet and the adapter.
- Apply PTFE tape (5-7 wraps) or pipe dope to the male NPT threads.
- Thread the adapter into the compressor outlet. Tighten securely using a wrench, but avoid overtightening.
Step 2: Mount the Main Distribution Line
Start running your main line from the compressor adapter. Remember the slight slope towards your intended drain point.
- Measure and cut your pipe. For PEX, use a PEX cutter for a clean, square cut. For aluminum, a hacksaw or pipe cutter works well.
- Secure the first section of pipe to the compressor adapter using the appropriate fitting.
- Use hangers or clamps to support the pipe. Space them according to the pipe manufacturer’s recommendations (typically every 3-5 feet for PEX, and similar for aluminum). This prevents sagging and stress on the connections.
- Continue running the main line, using elbows and couplings as needed, ensuring the entire line has a consistent downward slope.
Pro Tip: When installing hangers for PEX, use clamps that don’t constrict the pipe. PEX-A, in particular, has some expansion capabilities, and you don’t want to restrict that.
Step 3: Install Branch Lines and Drop Downs
As you run the main line, plan where you’ll need air outlets. Use tee fittings to create branches or drop downs.
- At the desired location for a drop, cut a section of your main line.
- Install a tee fitting. Connect the main line sections to the ends of the tee.
- Install a short piece of pipe (or full length if needed) into the remaining port of the tee, running vertically downwards.
- At the end of this drop, install a fitting for your quick-connect coupler.
Ensure all connections are secure and properly made according to the manufacturer’s instructions for your chosen piping system (crimping PEX, using push-fit connectors for aluminum/poly, or threading iron pipe).
Step 4: Incorporate a Regulator and Filter
Clean, regulated air is essential for tool longevity and performance. Install a regulator and filter/water separator, typically on the main line or a primary branch before your outlets.
- Install a tee fitting in your main line where you want the regulator.
- Connect the regulator/filter assembly into the tee using appropriate adapters. Ensure the airflow direction is correct (arrow on the fitting).
- The regulator allows you to set and maintain a consistent pressure to your tools, while the filter removes moisture and particulate. For best results, consider a combination unit that also includes an oil lubricator if you use air tools that require it.
Consult your compressor’s manual and tool manufacturer’s specifications for recommended operating pressure and filtration levels.
Step 5: Install Outlets and Quick-Connect Couplings
These are where you’ll plug in your tools. Choose industrial-style quick-connect fittings for durability and good airflow.
- On the end of each drop down or at strategic points, install a fitting that accepts your quick-connect couplings (usually 1/4″ NPT).
- Thread the NPT fitting into the end of your pipe or adapter.
- Screw the quick-connect coupling onto the NPT fitting.
Consider installing a ball valve before each outlet. This allows you to shut off air to individual drops if needed for maintenance or if a specific tool requires a different pressure setting.
Step 6: Install a Main Drain Valve
As mentioned earlier, a slight slope is crucial for water drainage. Install a drain valve at the lowest point of your main air line.
- This could be a simple brass ball valve.
- If your system is extensive, you might install an automatic drain trap at a low point.
- Ensure the valve is accessible for easy draining.
Step 7: Connect the Compressor
If you haven’t already, connect the main line to the adapter you installed on the compressor outlet. Ensure all connections are tight.
Leak Testing: The Crucial Final Step
This is arguably the most important step after installation. Even the best job can have a small leak that wastes air, strains your compressor, and reduces available pressure where you need it. Leaks can happen at fittings, connections, or even in the pipe itself if damaged.
How to test:
- Ensure all outlets are capped or that no quick-connects are engaged.
- Turn on your air compressor and let it build pressure to its normal working range (e.g., 100-150 PSI).
- Turn off the compressor.
- Listen carefully for